0%

你应该知道Costmap_2d 的这些细节

Costmap_2d 的插件

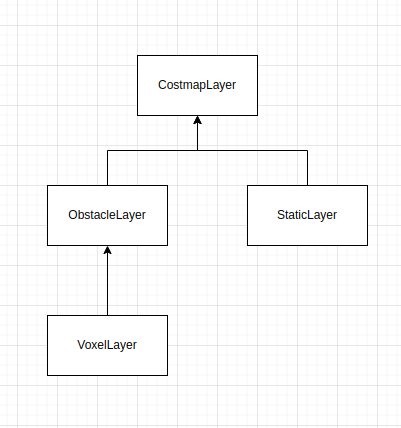
Costmap_2d 的插件都是继承于CostmapLayer。具体的关系如下图所示:
img

StaticLayer

StaticLayer内主要是通过接收map_server发布的地图话题来加载静态地图的。所以StaticLayer内是可以在线更改静态地图的。

ObstacleLayer

ObservationBuffer

ObservationBuffer 是一个障碍物观察数据的buffer。观测到的障碍物数据都将转成sensor_msgs::msg::PointCloud2格式,然后存储到ObservationBuffer 中。

ObservationBuffer 里存储的历史障碍物数据可以根据想保持的时间来清空。期望保持的时间主要由变量observation_keep_time_来决定。如果设置成rclcpp::Duration(0.0s)则表示每次都只存储最新的,历史障碍物数据都会被清掉。

看到这里,有同学可能会想,既然可以以时间为依据来清除障碍物,是不是也可以以其他条件来清除障碍物呢?答案肯定是可以的。这个就需要根据应用场景来选择了。比如:使用机器人的移动距离来作为判断条件。当观测数据时的机器人位置与现在机器人的位置超过多远就把该数据清掉。

ObstacleLayer

ObstacleLayer内可以加载多种传感器的障碍物观测数据。但是数据类型只支持PointCloud2LaserScan。其中LaserScan类型的数据会被转换成PointCloud2 类型数据。因为ObservationBuffer 只存储PointCloud2 类型数据。

ObstacleLayer内有下面几个层级参数需要关注一下:

1
2
3
4
5
6
7
8
9
declareParameter("enabled", rclcpp::ParameterValue(true));//使能该层

declareParameter("footprint_clearing_enabled", rclcpp::ParameterValue(true));//清楚footprint占用的区域

declareParameter("max_obstacle_height", rclcpp::ParameterValue(2.0));//高于此参数设定的高度的障碍物就忽略

declareParameter("combination_method", rclcpp::ParameterValue(1));//更新cost的方式,0->直接覆盖旧数据,1->取前后最大值

declareParameter("observation_sources", rclcpp::ParameterValue(std::string("")));//观测数据的名称

每种传感器的观测数据都可以独立配置如下参数:

1
2
3
4
5
6
7
8
9
10
11
12
13
14
15
16
17
18
19
20
21
22
23
24
25
26
27
declareParameter(source + "." + "topic", rclcpp::ParameterValue(source));

declareParameter(source + "." + "sensor_frame", rclcpp::ParameterValue(std::string("")));

declareParameter(source + "." + "observation_persistence", rclcpp::ParameterValue(0.0));

declareParameter(source + "." + "expected_update_rate", rclcpp::ParameterValue(0.0));

declareParameter(source + "." + "data_type", rclcpp::ParameterValue(std::string("LaserScan")));

declareParameter(source + "." + "min_obstacle_height", rclcpp::ParameterValue(0.0));

declareParameter(source + "." + "max_obstacle_height", rclcpp::ParameterValue(0.0));

declareParameter(source + "." + "inf_is_valid", rclcpp::ParameterValue(false));

declareParameter(source + "." + "marking", rclcpp::ParameterValue(true));

declareParameter(source + "." + "clearing", rclcpp::ParameterValue(false));

declareParameter(source + "." + "obstacle_max_range", rclcpp::ParameterValue(2.5));

declareParameter(source + "." + "obstacle_min_range", rclcpp::ParameterValue(0.0));

declareParameter(source + "." + "raytrace_max_range", rclcpp::ParameterValue(3.0));

declareParameter(source + "." + "raytrace_min_range", rclcpp::ParameterValue(0.0));

有几个比较重要的参数,这里说明一下:
observation_persistence: 决定障碍物持续时间的参数。
obstacle_max_rangeobstacle_min_range:决定了距离传感器安装位置多少距离区间内的障碍物可以被标记到costmap上
raytrace_max_rangeraytrace_min_range: 决定了距离传感器安装位置多少距离区间内的障碍物可以被清除掉

这里使用了tf2_ros::MessageFilter来处理障碍物观测数据。主要是因为tf2_ros::MessageFilter可以保证只有在传感器的framglobal_framtf关系有效的情况下再执行数据的回调函数。在障碍物数据叠加到costmap层的过程中需要将障碍物数据转换到全局坐标系下。所以需要保证其tf转换是有效的才进行数据处理。

1
2
3
4
5
6
7
8
9
std::shared_ptr<tf2_ros::MessageFilter<sensor_msgs::msg::PointCloud2>> filter(
new tf2_ros::MessageFilter<sensor_msgs::msg::PointCloud2>(
*sub, *tf_, global_frame_, 50, rclcpp_node_,
tf2::durationFromSec(transform_tolerance)));

filter->registerCallback(
std::bind(
&ObstacleLayer::pointCloud2Callback, this, std::placeholders::_1,
observation_buffers_.back()));

RangeSensorLayer

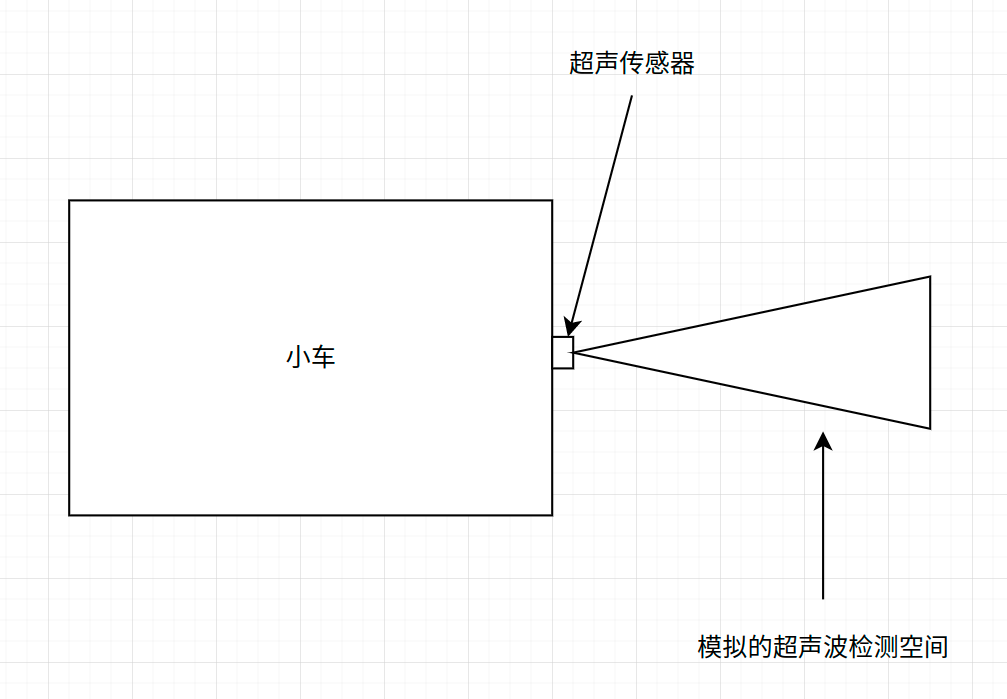
这是Navigation2中新增加的一个costmap插件层,主要维护超声波的数据。它对超声波数据的模拟是用圆锥体有来表征超声波的检测空间。映射到costmap上时则是三角形。这可能是最接近超声波检测空间的规则图形了吧!但为了直观展示这种模拟方式和实际超声波检测的差异,我在下面放了两张图片。

模拟的超声波检测空间
img

实际超声波的检测空间
img

RangeSensorLayer层中,超声波检测区域中的栅格值是通过概率模型(probabalistic model)进行更新的。

1
2
3
4
5
6
7
8
double sensor = 0.0;
if (!clear) {
sensor = sensor_model(r, phi, theta);
}
double prior = to_prob(getCost(x, y));//得到原来被占用的概率
double prob_occ = sensor * prior;
double prob_not = (1 - sensor) * (1 - prior);
double new_prob = prob_occ / (prob_occ + prob_not);//更新被占用的概率

InflationLayer

InflationLayer中的灵魂操作就是cost的更新函数了(updateCosts)。下面简单梳理一下函数执行的流程:

  1. 提取出障碍物点

    1
    2
    3
    4
    5
    6
    7
    8
    9
    10
    11
    // Start with lethal obstacles: by definition distance is 0.0
    auto & obs_bin = inflation_cells_[0];
    for (int j = min_j; j < max_j; j++) {
    for (int i = min_i; i < max_i; i++) {
    int index = static_cast<int>(master_grid.getIndex(i, j));
    unsigned char cost = master_array[index];
    if (cost == LETHAL_OBSTACLE || (inflate_around_unknown_ && cost == NO_INFORMATION)) {
    obs_bin.emplace_back(index, i, j, i, j);
    }
    }
    }
  2. 迭代障碍物点并更新cost

1
2
3
4
5
6
7
8
9
10
11
12
13
14
15
16
17
18
19
// assign the cost associated with the distance from an obstacle to the cell
unsigned char cost = costLookup(mx, my, sx, sy);
unsigned char old_cost = master_array[index];
// In order to avoid artifacts appeared out of boundary areas
// when some layer is going after inflation_layer,
// we need to apply inflation_layer only to inside of given bounds
if (static_cast<int>(mx) >= base_min_i &&
static_cast<int>(my) >= base_min_j &&
static_cast<int>(mx) < base_max_i &&
static_cast<int>(my) < base_max_j)
{
if (old_cost == NO_INFORMATION &&
(inflate_unknown_ ? (cost > FREE_SPACE) : (cost >= INSCRIBED_INFLATED_OBSTACLE)))
{
master_array[index] = cost;
} else {
master_array[index] = std::max(old_cost, cost);
}
}
  1. 将在膨胀半径内的栅格点加入到膨胀队列里
  • 首先向四周扩展栅格
1
2
3
4
5
6
7
8
9
10
11
12
13
// attempt to put the neighbors of the current cell onto the inflation list
if (mx > 0) {
enqueue(index - 1, mx - 1, my, sx, sy);
}
if (my > 0) {
enqueue(index - size_x, mx, my - 1, sx, sy);
}
if (mx < size_x - 1) {
enqueue(index + 1, mx + 1, my, sx, sy);
}
if (my < size_y - 1) {
enqueue(index + size_x, mx, my + 1, sx, sy);
}
  • 选取在膨胀半径内的栅格加入到膨胀队列里
1
2
3
4
5
6
7
8
9
10
11
12
13
14
15
16
17
18
19
20
21
22
23
void
InflationLayer::enqueue(
unsigned int index, unsigned int mx, unsigned int my,
unsigned int src_x, unsigned int src_y)
{
if (!seen_[index]) {
// we compute our distance table one cell further than the
// inflation radius dictates so we can make the check below
double distance = distanceLookup(mx, my, src_x, src_y);

// we only want to put the cell in the list if it is within
// the inflation radius of the obstacle point
if (distance > cell_inflation_radius_) {
return;
}

const unsigned int r = cell_inflation_radius_ + 2;

// push the cell data onto the inflation list and mark
inflation_cells_[distance_matrix_[mx - src_x + r][my - src_y + r]].emplace_back(
index, mx, my, src_x, src_y);//推到相应的膨胀层的vector内
}
}

其中inflation_cells_中将按圈层存储栅格。

需要注意的一点是,InflationLayer中并没有包含存储地图数据的costmap_2d层,它唯一的工作就是把之前层上的障碍物信息在组合层里膨胀一下。

关于costmap的插件配置,这里需要注意一下配置的顺序。代码中插件加载的顺序就是按照配置顺序来的。”inflation_layer”一般放在最后面。因为它最终将前面几个层的障碍物信息一起膨胀。如果不想膨胀某个插件层,则可以将其放在”inflation_layer”之后。

1
plugins: ["static_layer", "obstacle_layer", "voxel_layer", "inflation_layer"] 

Costmap_2d Filters

Costmap_2d Filters 的主要作用是给区域划定不同的功能属性。比如:KeepoutFilter就可以实现虚拟墙的功能。它能限定某些区域机器是不能进去的或者某些区域是不建议通过的。又比如:SpeedFilter限制了在某些区域内机器人的运动速度。

它与CostmapLayer有何不同呢?

  1. Filter调用updateBounds函数基本不干什么事,也不更新cost变动的区域。
1
2
3
4
5
6
7
8
9
10
11
12
void CostmapFilter::updateBounds(
double robot_x, double robot_y, double robot_yaw,
double * /*min_x*/, double * /*min_y*/, double * /*max_x*/, double * /*max_y*/)
{
if (!enabled_) {
return;
}

latest_pose_.x = robot_x;
latest_pose_.y = robot_y;
latest_pose_.theta = robot_yaw;
}
  1. Filter可能并不会更改栅格值,比如SpeedFilter只能根据自身维护的栅格值来调整速度限制。而CostmapLayer常常是需要对栅格值进行修改的。

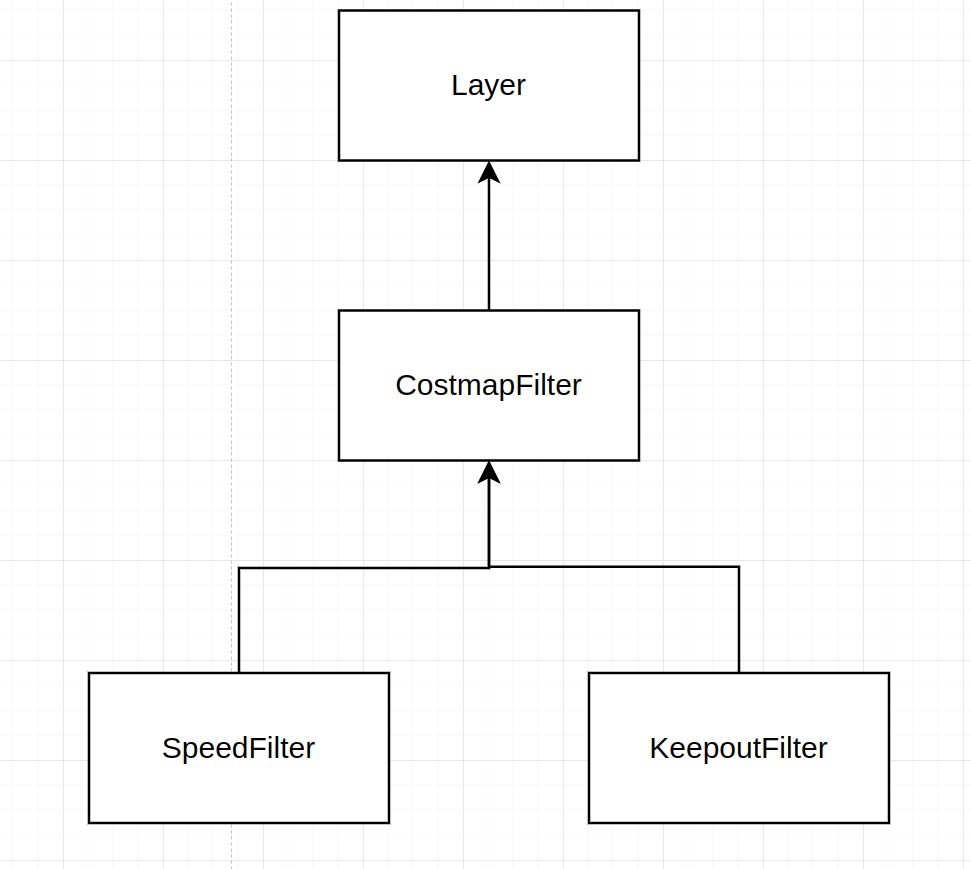
Costmap_2d Filters之间的关系图如下:
img

Costmap_2d Filters的运行机制如下图所示:

img

CostmapFilterInfoServer负责加载一些参数发布给filterMapServer主要是加载地图文件并发布给filter

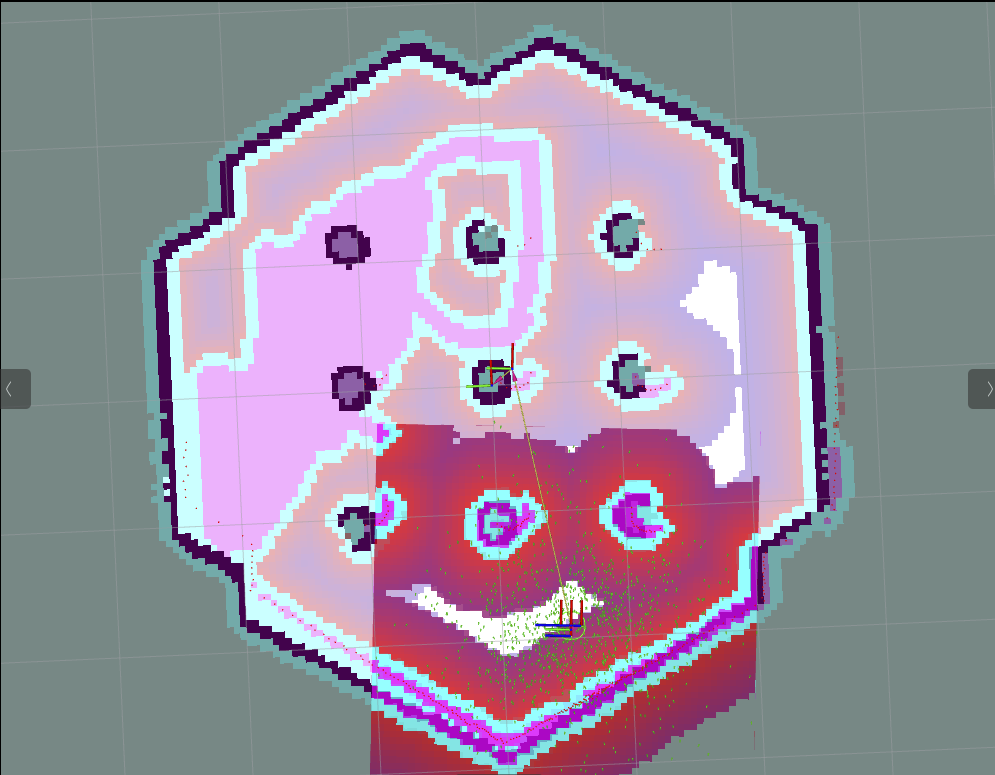
你可能发现了。Filter正是利用地图文件来获取区域信息的。而这些地图文件是可以自己定义的。比如你将原来地图文件的某些部分涂黑,那么这些黑色的部分在KeepoutFilter中将被视为禁区或者说虚拟墙。如果你将地图中不建议去的区域加重颜色,加载到KeepoutFilter中时这些颜色比较深但是又没有被标记为障碍物的区域会有比较大的cost值。这样路径规划时就会尽量绕开这些区域。只有在其他区域都完全不可行的情况下才会往这些区域规划路径。

下面是KeepoutFilter的一个例子:
img

SpeedFilter则会根据标记区域的深浅来约束最大速度。颜色越深,速度约束越大。反之,颜色越浅,速度约束越小。速度约束的方式有两种。一种是通过百分比,即将速度约束为最大速度的多少百分比。一种是绝对速度约束,即直接修改最大可行速度。

SpeedFilter会将计算得到的速度约束发送出来。nav2_controller接受到速度约束话题后将相应的值通过函数setSpeedLimit更新给控制器插件,比如TEB,DWB。